overthehorizon-goldensail

  • Subscribe to our RSS feed.
  • Twitter
  • StumbleUpon
  • Reddit
  • Facebook
  • Digg
Showing posts with label cooking. Show all posts

Sunday, December 15, 2013

Christmas Cookie Countdown - Oatmeal Raisin Cookies

Posted on 4:37 PM by fbdfbfb

What I should be doing right now is working on my latest review. But I couldn't help myself. It's time for Christmas cookies! And here is my first.

Now I'm not saying this is my recipe. It's actually Quaker's. But there are some alterations that I have made to suit our style. Some healthier alterations.

Here is my gluten-free version:

To-Die-For Oatmeal Raisin Cookies
  • 1/2 c butter
  • 1/2 c sucanat
  • 4 eggs, organic
  • 1-2 tsp. vanilla
  • 1 tsp. cinnamon
  • 1/2 tsp. Himalayan pink salt
  • 1/2 c. coconut flour
  • 1 tsp. baking soda
  • 2 c. quick oats
  • 1 c. organic raisins


Preheat oven to 350 degrees. Soften butter and add sucanat. Blend till smooth, then add eggs. Mix in vanilla, cinnamon, salt, coconut flour, and baking soda. Add oats and raisins. By then the mixture should be thick and hard to mix.


Drop onto ungreased cookie sheet an inch or so apart and bake for 7-8 minutes. Let cool a few minutes before removing to racks. Enjoy warm with a glass of raw milk! Yields about 42.


We adore chocolate but we also love oatmeal raisin cookies and these we have found to be the right recipe. Cook a little longer for a crispier top. And don't forget to tell me what you think!

Coming up next: Chocolate Mint Brownie Cookies, gluten-free!
Read More
Posted in baking, cooking, culinary, Culinary Chronicles | No comments

Thursday, April 18, 2013

Culinary Chronicles - Kale Chips

Posted on 2:42 PM by fbdfbfb

Have you ever had kale? Do you know what it is? No, it's not collard greens (blech!) but a delicious, sturdy, leafy plant in the broccoli, cauliflower, and brussels sprouts family.

I was introduced to it through a salad my grandmother made. It was covered in olive oil and sunflower seeds; I loved it! But unfortunately, some of my family didn't care for how priggly it was so it wasn't used as much in our salads.

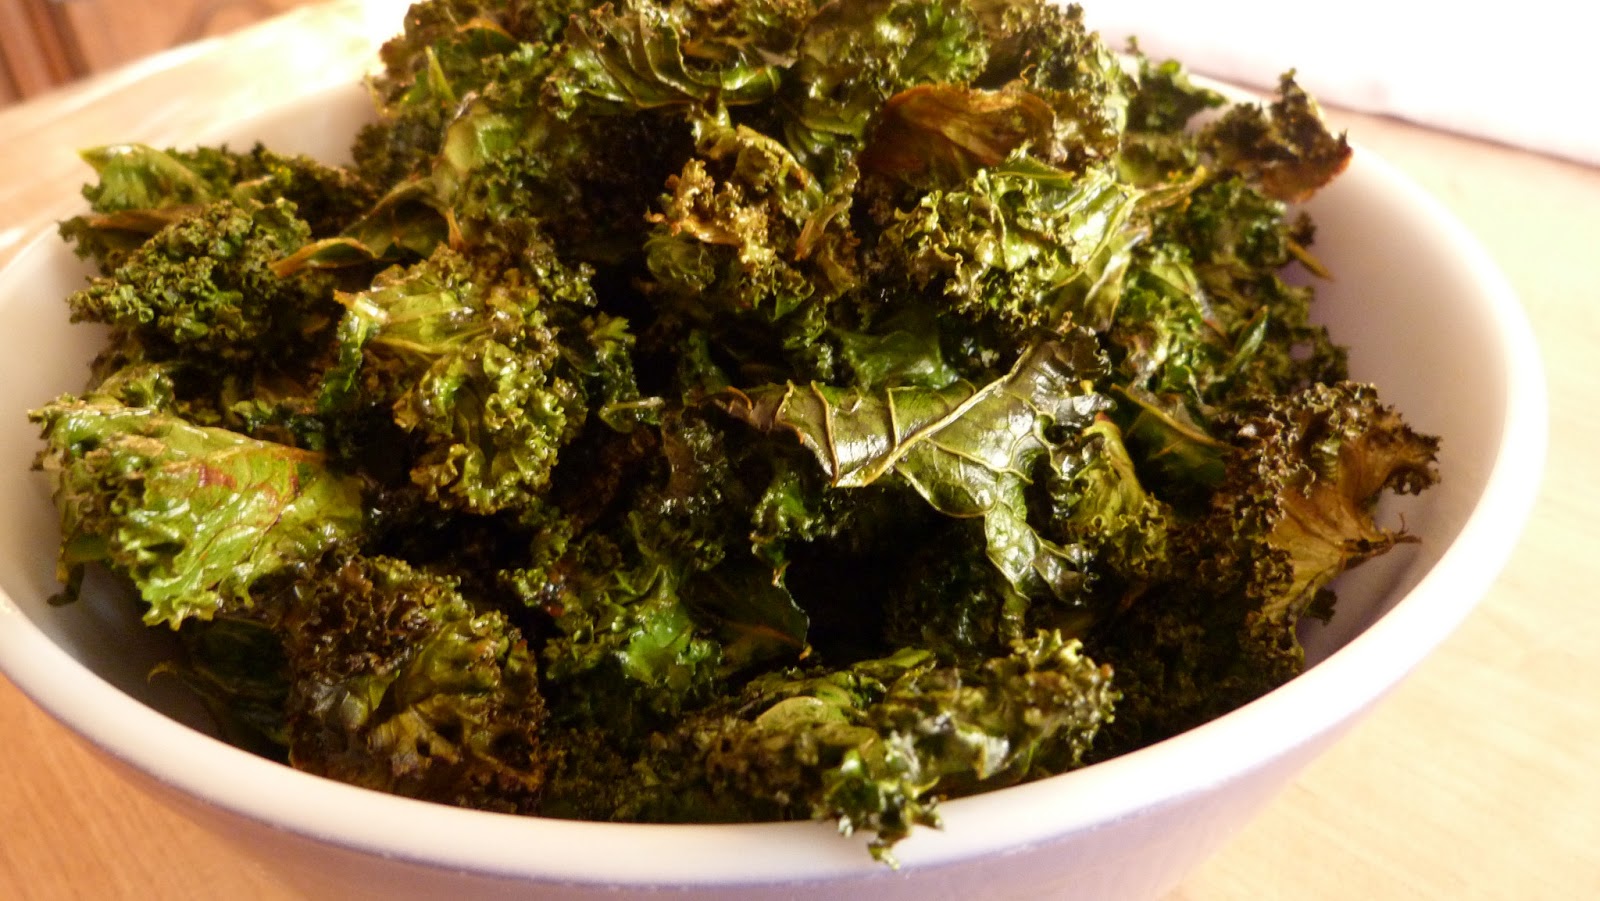
Then, a few months ago, I was reading a tweet by Bethany Hamilton about kale chips, and previously my Mum had said she found a recipe. So I was like, "Well, if that's not a sign, I don't know what is." So we put "fresh kale" on our grocery list. Since then, kale chips are fixed at least twice a week in our home. They're so delicious! When baked, they become crispy like a potato chip, only slightly more fragile, but so good. Needless to say, a fresh batch of these don't last long around here. To emphasize that, it took me 3-4 tries before I could get a good picture of them baked, it went so fast. Whoo!

The nutritional benefits alone are worthy of them becoming a part of your diet. Very high in beta carotene, and vitamin C, they also provide that important vitamin K that is sometimes more difficult to get. Plus it is rich in calcium and contains anti-cancer properties. During World War II, people were encouraged to grow and eat lots of kale because it provided important nutrients missing from their diet due to rationing. Isn't that interesting?

Also I read, at some point in Scotland's history, they considered it a staple to their diet, even going so far as to have created an idiom. When someone felt ill and didn't want to eat they'd say that person was "off his kail". Different spelling, of course, but that's to be expected.

So now that you know how good it is for you, would like to know the recipe? Here it is:

 Kale Chips recipe

Ingredients:
  • 1-2 bunches of kale (depending on the size of the bunch and how many you're fixing this for)
  • olive oil
  • salt 
  • seasonings of your choice

First, wash the kale and lay out to dry. This is the most important step. If the kale is not mostly-to-completely dry it won't hold the oil. Lately its been warmer and the kale has been drying a lot faster, which is good when I end up washing it late and needing to bake it not long after. *wry smile*


Here I have the kale spaced apart a good deal but only because it was a small head. I end up packing them in close most of the time and they still dry. It all depends upon the temperature and humidity level.


After the kale is dry, shred into bite-sized pieces, being sure to leave out the hard, thick stems. They don't ever bake well.


Using a gallon-sized, resealable bag, load about 2-3 handfuls of kale shreds into the bag and pour the olive oil on top. How much is hard to say. Just keep in mind that you don't want it dripping in olive oil but you do want each leaf to have some evenly distributed on it. Shake the bag until you get that even distribution.

Then dump onto a parchment covered pan. Season with salt and any other desirable seasoning. Personally, my favourite is salt and smoked paprika. Too delicious!

Bake at 275 degrees for 10 minutes, stir the kale around a little, then bake for another 10 minutes. If the kale is still a bit soft, leave it in for as long as it needs, just remember to keep an eye on it.


Now you have a wonderful snack! Make sure you get some before they're all gone; you are the cook, you deserve some reward.

And that does it. One kale recipe as promised. I hope you enjoyed the post, and if you have any questions (or if you see I have left anything out) leave me a comment below and I'll get back to you promptly.

Read More
Posted in cooking, culinary, Culinary Chronicles | No comments

Friday, April 5, 2013

Culinary Chronicles - Mexican: Stir Fried Nopales

Posted on 6:41 PM by fbdfbfb
As I have said before, having an International Farmers Market open up nearby has been the making of us. We've discovered fresh produce in a whole new way and we are totally inspired. One item in particular, that I never thought I'd buy, is nopales, or cactus. Have you ever had nopales before? Does it sound a little too adventuresome? I'd encourage you to consider otherwise. It really is a delicious food when prepared right.


Before buying the produce, I looked online for the proper way to prepare and cook them. I found a few YouTube videos that gave me the general idea and some recipes that sounded good. My first recipe with them was a simple dish, Fried Nopales. I chopped some fresh onion and garlic and put them all in a skillet. Unfortunately I cooked them too long and the result was a strong, sort of sour flavor. Its hard to describe.

The first thing you'll notice when preparing nopales is that they secrete a thick goo. At first this may seem unappetizing but don't worry, there's a way to handle that. My second recipe was to boil the nopales. The goo reacts with the water and causes a foam. I drained the foam, and water, and refilled the pan to reboil. I did this a handful of times and I had a sort of green bean-tasting dish, very bland compared to the last one.

My third recipe I tried was a keeper though, and that is the one I will share with you today. But first, lets cover how to prepare the nopales. Making sure it is prepared right is crucial to the 'safety' of your guests. Stickers can be very uncomfortable, I am told.

Preparing Nopales

Choose pads that are about a handbreadth in length and width. Any larger and they won't be quite as tender, plus they have bigger stickers.

Step 1: Wash the cactus pads.


Step 2: CAREFULLY, using a sharp knife, cut off the base of the nopales and trim around the whole pad, making it easier to remove the stickers on the outside.


 Step 3: Scrape off spines and stickers on both sides and then lay pad aside.


Step 4: Rinse all the pads in cool water, rubbing gently to make sure all the stickers have been removed.


Step 5: Chop pads into small chunks or as desired.

Now you are ready to cook!

Stir-Fried Nopales Recipe

Ingredients:
  • 8 nopales (cactus pads) about a handbreadth in length and width
  • 6-10 green onions
  • one bunch garlic cloves
  • 2 bell peppers (in the picture below you'll notice I used mini peppers)
  • 4 tomatoes (I used Roma)
  • fresh cilantro
  • coconut oil
  • red wine vinegar
  • salt and pepper

Serves 8


Add a little coconut oil (or any cooking oil) to a medium sized skillet and turn on a low heat. Once the oil is hot enough for sautéing add the chopped nopales and a little salt. Stir it around real well and by now the nopales should be secreting more of its goo. Put a lid on the skillet and cook until all the goo is gone, (10-15 minutes), stirring occasionally.


Meanwhile, cut the remaining vegetables and set aside. 


This is what your nopales should look like when all the goo is gone.


Now add onions and garlic and mix in. Cook for 5 minutes with the lid off.


Add peppers, salt and coarse ground peppercorns, and cook another 5 minutes.


Lastly, add chopped tomatoes, cilantro, and 2-3 tbsp of red wine vinegar. Cook for a few more minutes.

Now you have a delicious side to go with burritos, enchiladas, and anything else.


I hope you like this recipe and if you have any questions, just leave me a comment and I'll get back to you.


Read More
Posted in cooking, culinary, Culinary Chronicles, mexican | No comments

Friday, March 1, 2013

Culinary Chronicles - Asian (Korean) Cuisine #2: Pickled Korean Radish

Posted on 11:39 AM by fbdfbfb
When I discovered KFoodAddict.com I spent the next few days exploring and learning. I was totally inspired and ready to embark on a new 'cooking' journey. I started simple and made something we already had the ingredients for, Korean Egg Rolls. My family loved them and now my Mum has got on the 'bandwagon' as well. It definitely helps our inspiration having a fairly new International Farmers Market in town where we've been able to find so many new and foreign foods, especially produce.

I've tried a number Chloe's recipes (the author/cook of KFoodAddict.com), and have been encouraged to try some of my own Asian inspired experiments. See here for an example. (Frankly, my family isn't very comfortable when I refer to my cooking in the kitchen as experiments, I don't know why.)

One of the recipes she has is called Korean radish wrap, or Mussamali. It looked so good and fresh, I just had to try it. Not knowing where to find the already pickled radish I decided to make some myself. I looked for Korean Radish at the Int. Farmers Market, and surprisingly for me, found it right off. I realized afterward that I didn't have the necessary cutting tools to achieve the proper thinness, but since I had them I wasn't going to give up. I hand-sliced them one day and followed Chloe's recipe (found at the bottom of the recipe).


Here are my substitutions:

  • Instead of white vinegar I used Apple Cider Vinegar
  • Completely omitted the sugar (I didn't know what kind to used since we don't use white sugar, besides we avoid using sugar if we can help it)

I left it in the fridge for a week according to the recipe, and today I pulled it out. I tend to be on the negative side (bad, I know) so I didn't hold much hope. But fortunately everyone agreed that they tasted pretty good. But, unfortunately, my slices were still too thick, so I don't think I'll be able to wrap them. This time I might have to leave them open-faced. In the meantime, I am on the lookout for a good and thin slicer. Any suggestions?


Only after doing this did I consider looking for already pickled radish at the Int. Farmer's Market. And surprisingly, I found it. (Love the Int. Farmer's Market!) I was, on the other hand, disappointed to find it had MSG in it. Aside from the fact that its not the healthiest, it gives certain people headaches in our home. Maybe, if I wanted to use it instead of making my own, I'll be able to find another brand that doesn't have MSG in it.

Since our Sunday lunches are usually light, I'm thinking this would be great, but I'm not sure if I'll have the time to prepare it after church. Still working on that.

Thanks for reading. I hope the ups and downs of my experiments help you with yours.

And a great big thanks to Chloe Lim, the Korean Food Addict, for all her work in making this available to people like me who have no idea about how to make this stuff. Totally grateful!


Read More
Posted in Asian cuisine, cooking, culinary, Culinary Chronicles | No comments

Thursday, January 31, 2013

Culinary Chronicles - Asian Cuisine #1: Stir-Fried Bok Choy with Chicken

Posted on 2:15 PM by fbdfbfb
One of the things I like best is experimenting with different cuisines. This month I've been learning Asian, or more specifically, Korean cooking. Its all thanks to Chloe Lim, the Korean Food Addict (at kfoodaddict.com) who has posted many wonderful Korean dishes. I recommend you visit her site and learn some things. Its great!

The first time I looked through her site I was like, "Wow! That looks so delicious but I don't have some of those ingredients." So I made a list of all the dishes I wanted to try and took note of the things I needed. Some things that I have found to be very common in any Asian cooking are Soy sauce (which I knew already), sesame oil, and sesame seeds. Once I had my list ready it was time for the International Farmer's Market. I can't tell you how inspiring that place has been for us since it arrived last year. We've found so many new and foreign things, produce mostly, and it has definitely brought out the creativity in our cooking. There's nothing like walking out of the store with a buggy full of fresh produce. The feeling is one of satisfaction.

Since we started shopping there one of the items continually on our list is Bok Choy. I had never had it previously but I found a recipe/video on YouTube that I liked and wanted to try. So far I've tried Baby Bok Choy, Shanghai Bok Choy, and Lon Bok Choy. The first two are mini versions of the last, meaning Baby and Shanghai are small heads while the Lon are long, tall heads. I really can't say which I like the best without comparing their taste at the same time, but the Shanghai is usually the cheapest.

Technically, Bok Choy is Chinese, being a species of Chinese cabbage, even though another species, Napa, is used in the common Korean staple Kimchi, which I have not tried just yet but want to. The experiments I have been doing with Bok Choy I have not gotten from Chloe, the Korean Food Addict, but some of the other ingredients and techniques are.

At first, inspired by some of her meat dishes, I cut the chicken in bite-sized pieces and cooked them in a skillet with coconut oil (our favorite oil). But without good knives for cutting meat, this can be difficult. So this time I baked the chicken like we usually do and continued like usual; with a few changes of course. I always like trying something different. Here's my recipe:

Stir-Fried Bok Choy with Chicken


Ingredients

Serves 8
  • Chicken Thighs, skinless and boneless (Our favorite is Coleman's Organic from Cosco)
  • Ultra-refined, expeller pressed Coconut oil (there isn't a flavor to this kind, even though we buy the flavored kind as well)
  • Bok Choy (I used two bags of Shanghai Bok Choy)
  • Green Onions
  • Chive Flowers (pictured on the cutting board below)
  • fresh garlic cloves
  • fresh ginger
  • salt and pepper (we like to use unground Celtic Sea Salt)
  • sesame seeds
  • Bragg's Liquid Aminos (a Natural Soy Sauce alternative)
  • sesame oil
Directions:


Melt coconut oil in baking pans. Place chicken in pans and season with salt and pepper. Bake chicken in the oven at 350 degrees till done. 

Shanghai Bok Choy and Green Onions


Prepare Bok Choy by chopping the base off. Wash thoroughly. We like to use GSE (Grapefruit Seed Extract) in water.


Meanwhile, chop the chive flowers into a desired size. The first time I left them in longer lengths, which is visually appealing, and only put them in after everything was cooked, but I wasn't as fond of it that way.


Chop the garlic as well. My family likes larger chunks of garlic, and since garlic has so many health benefits, I added a lot. So far it looks like Korean's like lots of garlic in their cooking and that makes us happy.


Chop green onions and Bok Choy. I learned to cut Bok Choy first down its length to halve it and then chopped in chunks down the width. I prefer to leave them in larger bits than smaller to equal the size of the chicken.

Slice fresh ginger in thin coins. You'll notice in the next picture some of the coins of ginger are thick; it's more beneficial to slice them thin.


In a large skillet (or even a wok if you prefer), add enough coconut oil to cover the bottom. Once oil is hot, add ginger coins and cook until the juice of the ginger is adequately infused into the oil.

You might notice I like ginger. I adore cold ginger tea with lemon (a recipe I will endeavor to post). Ginger is a recent ingredient we've come to love. At first I wanted it just to make tea so I learned more about it: how to take care of it and prepare it. Its a wonderful ingredient deserving a post all its own.


Remove ginger coins and add green onions, chives, and garlic. Cook till lightly browned.


Add Bok Choy and stir till all the Bok Choy is well covered in oil. Season with salt and pepper. Cook for a few minutes, then add some liquid aminos, (or Bragg's, as we call it) and cook till done, which is where the harder chunks of Bok Choy are starting to get translucent. I have at times covered it with a lid and let it steam for a while but it tends to cook down a little too much so I left it off.


Cut chicken into bite-sized pieces and add to the Bok Choy. Add a couple of teaspoons of sesame seeds and cook a little longer to blend the flavors. Then drizzle a desired amount of sesame oil over it. We use Spectrum's brand of Toasted Sesame oil.


Serve over brown rice or Annie Chun's Brown Rice Maifun Noodles. And enjoy!

Variations

Our favorite version is the one I described above, but I have also made a version with cubed ground beef. We keep our ground beef in the freezer until we need it and get it out a few hours before cooking time to thaw slightly. If cubing it, only get it out a couple of hours before or you won't have cubes but bits.

With Cubed Ground Beef

Another way I like to prepare it as a side dish without meat. I fix it as before but at the point where I've added the Bragg's I add a couple of cups of chicken broth too. Then I put a lid over it and let it steam till done.You could use vegetable broth in place of the chicken, or even beef. Be creative! And never be afraid to experiment.

Let me know if you tried my recipe, and tell me how it goes. I'd love to hear from you.

On my list for future creations:
  • Kimbap (Korean sushi) at KFoodAddict.com
  • Butternut Pancakes (by another Korean cook, Maangchi)
  • Korean Radish Wrap at KFoodAddict.com
  • Sesame Leaf Pockets at KFoodAddict.com
Plus I want to make my own rice cakes so I can try some of Chloe's other recipes. So excited!


Read More
Posted in Asian cuisine, cooking, culinary, Culinary Chronicles | No comments

Wednesday, November 21, 2012

Happy Thanksgiving - Quick and Easy Pie Crust

Posted on 5:52 PM by fbdfbfb

Is the pie crust one of the worst parts of making pies? Do you usually buy your crusts so that you won't have to make them? Well here is the recipe for you.

Okay, so that sounded like a commercial. But I do have a pretty good recipe here.

Preheat oven to 375 degrees
  • 1 1/2 c. flour
  • 1/2 tsp salt
  • 3 tbsp (raw) milk
  • 1/2 (?) c. oil (olive oil, melted coconut oil or butter) 

Add the flour and salt directly to pie dish. Mix in milk and oil being careful with the oil. You might need less or more oil, all depending upon the desired consistency. Too oily and the crust will fall, too dry and it will easily crumble. Once well mixed, start patting down with your hand, working all the small crumbles smooth and melded together. Then work the dough up the sides to form crust. Prick with fork and bake for 10-12 minutes or until crust looks slightly crispy. Let cool.

I use this recipe for cold pies (cream pies), hot pies (baking it all together), and even for my quiches, when I want a crust.

You might think, as gourmet as I want to be, I would use a more traditional pie crust recipe involving rolling it out and shaping the top. And I have tried that before. But this is really good for quick, and tasty, crusts. We've actually been using for years now.

Note: I didn't remember until a second ago that I didn't bother to crimp the tops of the crust. Oops. All well.


Read More
Posted in cooking, culinary, pie crust, recipe | No comments
Older Posts Home
Subscribe to: Posts (Atom)

Popular Posts

  • The Harvey Girls (1946) - Movie Review
    The Harvey Girls, starring Judy Garland, John Hodiak, and a plethora of Hollywood names, is a bright, show-stopping musical with the usual g...
  • State Fair (1945) - Movie Review
    Starring beautiful Jeanne Crain, dashing Dana Andrews, crooner Dick Haymes, and songbird Vivian Blaine, State Fair is comical, dramatic, and...
  • Classic Christmas Movie Review #1 - Miracle On 34th Street
     For all those who were expecting this sooner, I ask your forgiveness. My schedule didn't work out like I hoped it would. But hopefully ...
  • Bryson Andres - Talented Musician!
    I'm not a One Republic fan but this guy plays it great. Excellent talent, excellent equipment. This is just one of the many videos of hi...
  • The Woman in White (1948) - Movie Review
    Hello again, everybody! Halloween is almost here and this is a movie you must see! Full of suspense and danger, this movie will definitely g...
  • Classic Christmas Movie Review #2 - Christmas in Connecticut
    Welcome to the 2nd Classic Christmas Movie Review: Christmas in Connecticut. Made in 1945, it is the story of a woman who knows how to write...
  • What They Can Do Without Bones...
    Picture courtesy of NOAA Ocean Explorer The D2 moves along the rock face and stops to zoom in on an interestingly carved cavity. Inside is a...
  • A Princess For Christmas (2011) - Movie Review
    Okay, so I know Thanksgiving isn't over yet, and I'm not trying to rush it by. But as I said in my last post, I am not going to wait...
  • Loops & Threads Zig-Zag Pillow
    Its always nice to find new patterns when shopping in a craft store, but its not nice when you sit down to do it and find out its not correc...
  • Our Eyes Under the Sea
    NOAA ROV Deep Discoverer (Picture courtesy of Ocean Explorer) ROV is an acronym for remotely operated vehicle. These vehicles are explicitly...

Categories

  • Above Rubies
  • amigurumi
  • amphibians
  • animal
  • article
  • Asian cuisine
  • autumn
  • baby squirrel
  • baking
  • Beauty and the Beast
  • birds
  • blog updates
  • blogging
  • bluebird
  • book review
  • books
  • bread
  • Bryson Andres
  • cat
  • Chris Pinto
  • Christmas
  • classic
  • clothing
  • cooking
  • costume
  • crafts
  • Creatures in My Backyard
  • crochet
  • crochet pattern
  • Crochet Spot
  • culinary
  • Culinary Chronicles
  • David Barton
  • Davis Bunn
  • desert spider
  • dogs
  • earrings
  • equal
  • expedition
  • exploration
  • fashion
  • fashion history
  • founding fathers
  • greek mythology
  • hair styling
  • Halloween Movies
  • hat
  • hearts
  • history
  • hobbies
  • interests
  • John Adams
  • Karen's Whimsy
  • kitten
  • libraries
  • Maaria
  • makeup
  • marine biology
  • marine technology
  • maritime archaeology
  • meerkat
  • melanin
  • men's fashion
  • mexican
  • missionary
  • mistletoe
  • movie
  • Movie Night
  • movie review
  • mushrooms
  • musician
  • mythology
  • niche
  • NOAA
  • nuthatch
  • ocean
  • Pakistan
  • parasitical wasp
  • persecution
  • pie crust
  • proof
  • publishing
  • race
  • recipe
  • reptiles
  • roly poly
  • scarf
  • SecretBelievers.org
  • sewing
  • site
  • sourdough
  • story
  • style
  • talking bird
  • testimony
  • Thanksgiving
  • The Constitution
  • the gospel
  • turtle
  • Valentines
  • video
  • Wallbuilders
  • Warren Throckmorton
  • woodpecker
  • Worldview Weekend
  • writing
  • Zig-Zag Pillow

Blog Archive

  • ▼  2013 (63)
    • ▼  December (2)
      • Christmas Cookie Countdown - Oatmeal Raisin Cookies
      • What Do You Do When...
    • ►  November (4)
    • ►  October (4)
    • ►  September (4)
    • ►  August (9)
    • ►  July (6)
    • ►  June (7)
    • ►  May (7)
    • ►  April (4)
    • ►  March (6)
    • ►  February (4)
    • ►  January (6)
  • ►  2012 (38)
    • ►  December (6)
    • ►  November (6)
    • ►  October (5)
    • ►  September (2)
    • ►  August (7)
    • ►  July (4)
    • ►  June (3)
    • ►  May (3)
    • ►  April (2)
Powered by Blogger.

About Me

fbdfbfb
View my complete profile